Category Archives: Uncategorized

You will have a fishy

Project 2 of 48

Tuesday 4 Feb was  a fairly quiet day at the office since it was just after CNY so I managed to have an uber productive evening. We had dinner together at home,  on a weeknight! And I cooked, did laundry and a giant clearout of the bombshelter-cum-store.

Now we can retrieve our vacuum cleaner without worrying about an avalanche of bags and suitcases..

Labelled drawers!


Project 48

I have decided (admittedly a little belatedly..) that I will do a Project 48 this year as a complement to my solemn vow of at least 4 posts a month. I suppose I’m being a little bit chicken about it, but 52 projects feels a little daunting and I don’t really want to set myself up for certain failure (and doom..doom..doom… :p).

I will create or remake 4 somethings a month with my hands and blog about them.

Without further ado..

We had a number of friends and relatives welcoming little people into their lives last year – celebration cards!

The pink bunting card was made of fabric I saved from shortening a dress. The neat factory-sewn hem was perfect for the top of the bunting, all I needed to do was cut little triangles and thread some string through. I googled pictures of prams, found one I liked and did a freehand drawing in pencil, before going over it with an inky black pen. I tried using a sharpie but found that there was too much ink bleed, so I ended up using a freebie law firm pen which worked very well.

The blue owl card was my first attempt at sewing text, I dabbled in cross-stitch when I was little but always found that to be cross-eye inducing ( pardon the terrible pun).  The felt and the owl were also leftovers from previous projects.

I’m pretty happy with the bunting card, but I think the owl card could use more elements as it looks quite bare at the moment. Inspiration hasn’t struck yet, so for now they are sat in the card box patiently waiting their turn.


Skittles’ Dress #2

Happy 2014!

I didn’t really make any New Year resolutions in 2013 save for the vague notion of keeping a monthly journal (but I managed to skip a quarter of the year..). Looking back, it seems like the first 6 months were dominated by work, and thereafter we had a series of trips with family and friends interspersed with more work and yoga.

This year, I’d like to be more deliberate about setting aside time for creativity and writing, consider this my solemn vow to post at least 4 times a month.  I have a few completed projects on the blog backburner which will help  – I think I need to reinforce the blogging habit as well as work on style and content.

And so it begins…

Christmas and Chinese New Year were not far away  at the time of sewing so it felt right to make a little red dress for Skittles. I started with the same pattern I used for Dress 1, but this time I added a little ruffle at the bottom. I considered adding a pocket and actually made one but the scale was off and I ran out of fabric.. oh well.

Lessons learnt this time are:

1. Technique –  bias tape to finish the collar and armholes before joining up the sides. I also need to work on sewing curves smoothly.
2. Sizing – I need to shrink the pattern to fit Asian toddlers. Although Skittles has since arrived and is not a dainty china princess, I ended up taking the dress a bit down the sides   as the arm holes seemed ginormous.  You can see what a difference it made!
3. Ruffles – I should make a single continuous ruffle instead of 2 separate pieces. The length of the ruffle should be at least double the diameter of the hem to make a flouncier ruffle. A 4 inch width would have worked better with the proportions.

I still have a couple of baby items to post about, then I shall move on to paper..


I put some “new” shoes on and suddenly everything’s right

Egad it’s September! I’m beginning to realise that blogging is not unlike detoxing-you start with the best of intentions, fall of the wagon a few weeks in, wake up and realise a month has gone by but you only had 1 dry day and scramble to do penance!

Exhibit A:  well loved and very comfy Geox Respira flats. These were a birthday parent from my mum and I’ve wore them almost every day for 2 years. They are perfect for the home-station-office-out-home commute, with the added bonus of sweaty feet defence. Originally white and navy, they’ve gotten a little worst for wear – prime candidate for a minor experiment. No photos since the close up ain’t pretty!

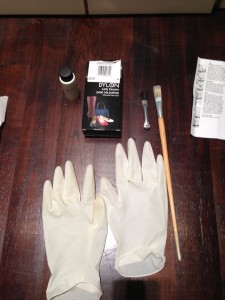
Exhibit B : Dylon leather shoe dye. The kit comes with premixed dye, a small brush and a cleaning block that looks a bit like a nail buffer.


Exhibit-B-225x300


Step 1  : Assemble your weapons. The little brush that came with the kit had rather stiff bristles so I used an old paintbrush instead.

Choose-your-weapons-225x300


Step 2: Clean your item with the cleaning block per the enclosed instructions. Allow the shoes to dry, then stuff newspaper in the toes to minimise creasing.

Step 3: Shake the bottle of dye well and start painting your shoes. As with “household” painting, thin and even is the way to go. There will be an amazing moment of instant gratification as the off white shoes magically disappear right before your eyes.

Step 4 : Admire the before and after.  I left them to dry overnight and touched up the dye job on Day 2, followed by an extra coat of waterproofing on Day 3.

Tadaa!

Sidenote: I’ve worn them for around 3 weeks now in the tropical weather + rain and they’ve held up fine!

Skittles’ first dress

I was browsing Martha’s website one day in search of easy sewing projects and found this sweet pattern.

Sadly I was fresh out of vintage teatowels, but had some destroyable man shirts from my very patient husband (“Babe, I’m never going to wear that shirt again, it must be destroyed.” “But the cotton is so good, it’s a TM Lewin shirt! I’m sure I can do something with it, I’ll just put it in the sewing cupboard black hole.”) Shirts tend to wear around the collars, cuffs or armpits, but often the rest of the fabric is in perfectly good nick and I’m always loathed to throw them away.

Step 1 – Print out the pattern and tape it together
Pattern

Step 2 – Lay the pattern on your fabric and cut it out. I didn’t take a progress photo, but instead of cutting two front pieces, I essentially cut a single front piece since the front of a shirt is already composed of two separate pieces.

Step 3 – Join the sides together. I left the collar and armholes to the end.

Step 4 – Finish the collar and arm holes with bias tape cut from the shirtsleeves. I decided not to add the frill at the bottom since it didn’t seem to go with the clean lines of the dress. Instead, I made a fabric rose by handgathering a strip of fabric. The big one was my first attempt and I think I gathered it a bit too loosely, the littler one was better:)

And done! I really enjoyed this project. We have a little niece due in October (currently referred to as Skittles) so I’m planning to make a few more little dresses for her.

A Joyful Giraffe..

I’m wandering down a different path  with this one – after the last landscape I really wanted to do something different. Something that would be a little surreal, predominantly monochrome but still high contrast. Searching Dali, Miro and Magritte online was really inspirational and I started to think of fluidity, movement and dancers. Since I got the JG domain name about this time (Note-I think I started in March?) , it hit me – a giraffe ballerina!  ( I promise this made perfect sense in my head).  The ballerina’s body is based on a photo with the caption “Imaging the Dance”. I can’t remember who the photographer is as the printout isn’t with me now, but I’ll update the post when I retrieve it. In the meantime, hattip to you Mr Photographer, thank you very much! *update- the photo was captioned ” Imaging The Dance, Marco Cappalunga”

I didn’t really have a plan for the background at this point, but I felt it needed something that would evoke a theatre. Chequerboard floors came to mind, so first there was a wonky sketch, then a lesson in perspective..

Last weekend was a breakthrough and I think her vertical leg finally looks much better- less like a static concrete pillar and more like an actual leg. The hands still need a lot of work and I’m finding the knuckles really tricky. Also I think I’ve accidentally inverted her wrist..

I’m hoping I can get’er done in 3 more sessions, then move on to her companion piece!

Hit me baby one more time

This is my second attempt at a first blog. The first attempt was 8 years ago, had an affected name and I was so hung up about sounding clever I didn’t even make it to the first post. This time I’m going to write about what makes me happy, be it painting, sewing, cooking or baking ( the good, the bad, the ugly but edible :) ).  After all, on the Internet, nobody knows you’re a dog.

BurntCake30June13